This post is the fifth of a series on Threat Intelligence Automation topic.
Post 1: Architecture and Hardening of MineMeld
Post 2: Foundation: write a custom prototype and SOC integration
Post 3: Export internal IoC to the community
Post 4: Search IoC events with SPLUNK
Long time since my last post. I was very busy creating Cyber Saiyan – a non-profit organization – and organizing RomHack 2018, a free cyber security event that will take place in Rome next September 22th.
![]()
On the field of threat intelligence automation and info sharing community building, the work continued too.
I’m working hard with italian community and we setup a STIX/TAXII network using a combination of open source sofware: MISP, OpenTAXII and MineMeld. We are now testing a complex consumer/producer network where companies (producers) can push IoC that, after validation, are injected into the consumer network, a TAXII service built on top of MineMeld.
I already covered the IoC export with MineMeld on post 3 but it was a very simple and not scalable setup; I will detail the new setup in a dedicated post when we reach a stable and modular configuration.
In this post I show you how to connect to a STIX/TAXII service using the next-generation (NG) miner that Luigi Mori wrote for us.
The new miner, called minemeld-taxii-ng, is available on github and has two nodes:
- the miner: taxiing.phishtank
- the output: taxiing.exampleDataFeed

I just cover the miner usage to collect STIX data from a TAXII service.
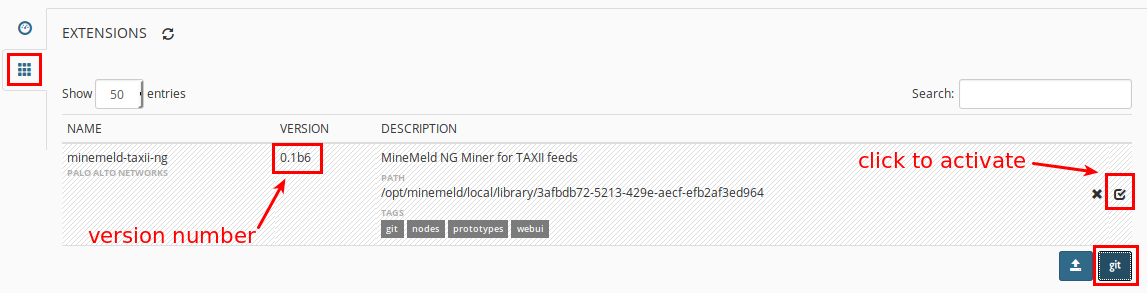
First of all we need to install the new miner extension. To do this go to System menu and click on Extensions button (left); then click on git button, add the address https://github.com/PaloAltoNetworks/minemeld-taxii-ng.git and click RETRIEVE.
Choose version 0.1b8 (or a newest available), click INSTALL and activate the extension (by default is disabled). Notice that as of today (31th of March 2018) the shown version is 0.1b6, I sent a PR to fix this.
Move to Config / Prototypes page and search for the new installed node (taxiing.phishtank).

Click on the miner, then the NEW button (top-right) and make a new prototype to connect to your STIX/TAXII service. Change following values:
- NAME: the name of the new prototype
- DESCRIPTION: a description of the new prototype
- CONFIG
- collection: the TAXII collection to pull
- discovery_service: the FQDN of the TAXII discovery service
- user: user of TAXII service
- password: password of TAXII service

On the prototypes page search for the new one (minemeldlocal…).

Click and CLONE it using the top-right button (change the NAME to whatever you want).
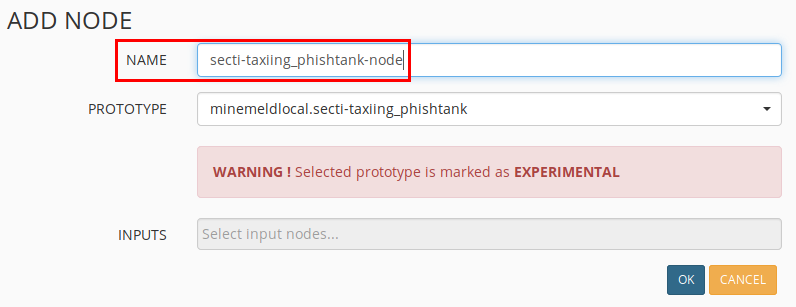
COMMIT the changes and MineMeld server will restart. On the NODES menu you can check the new miner status (the color goes from gray to green).

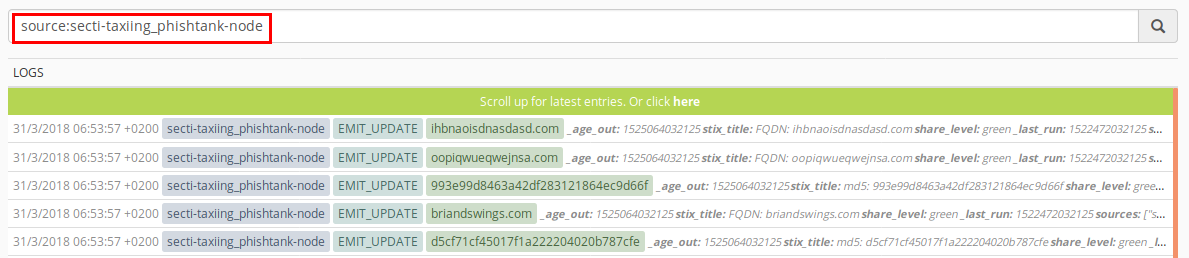
The NG miner starts collectiong STIX IoC that we can use as input for our processors.
I hope someone else can test this new miner with other STIX/TAXII services and send us a feedback, so please use the comment section to do this 🙂
merlos

SIR,
I wanted to know if we can import taxii/stix feeds for ibm x force free feeds. and simiarly add a taxii miner on to minemeld and integrate.
LikeLike
Didn’t tried this integration, you can check with minemeld community and report back.
LikeLike
sir,
i tried it!
it is possible.
but we need to work with the miners!
LikeLike
Hello, please currently I have an issue with eti.eset feeds. It seems that eset feeds are TAXII1.1 with STIX2 combination and your minemeld plugin can’t correctly parse the eset eti feeds. I’m getting this kind of output:
[file:hashes.’SHA-256’=’08ed205b4b3d8edafdb1d74ff8396040326a9a3606e036add0d5d6d074e64d7c’] OR [file:hashes.’SHA-1’=’04ba79418c5dbe0643a285d3b8989df8b0c5e7dd’] OR [file:hashes.’MD5’=’21c74966b866527710df480f36c72fcb’]
[file:hashes.’SHA-256’=’4331120e50584e74b522d1aafab8833fc01f74f9e5efa610a9ccfa723b7ddbff’] OR [file:hashes.’SHA-1’=’724847844c2e78088cf327c1cba415ef91dd2c4d’] OR [file:hashes.’MD5’=’bd75c9ba5a883cecc2ca51a98f57ca69′]
[file:hashes.’SHA-256’=’50173a90c7c0b0d00442e9a825b6b8f82b83ad02c7cb01fcbe995342926ac030′] OR [file:hashes.’SHA-1’=’e5d329549b9763551521c49b1fb128f3c953b355′] OR [file:hashes.’MD5’=’406033a2f8a950463c3cd484147ef153′]
[file:hashes.’SHA-256’=’536f0043e9e4c67de2712665b696352676047f7506a00874f998dc1444a036b5′] OR [file:hashes.’SHA-1’=’23794a1ac33421764919a8828f7fe88c0c896f8b’] OR [file:hashes.’MD5’=’ea982ac2570d66dc2b4e35a14194c590′]
[file:hashes.’SHA-256’=’61c8c0e9a20644101cf64bda7b56d3556acc4279b8ddadc672d745e75531981a’] OR [file:hashes.’SHA-1’=’880479ba95718af5a2567b39629d8f147fdd7521′] OR [file:hashes.’MD5’=’8848cfeceaa08426b3c9c1d9f026847c’]
[file:hashes.’SHA-256’=’868acb0ce8a0a1bf91d315411a2a94a76fc9f813b1c45df010de1e79bd57b292′] OR [file:hashes.’SHA-1’=’83f8310bb0ba6070ac7550b1e81d96139bb283a1′] OR [file:hashes.’MD5’=’d86c651694263f419cd8e97ca3c782e9′]
[file:hashes.’SHA-256’=’c3d794023da96d336a20c181b7592966966f44a58c7e8242fe047558a4784894′] OR [file:hashes.’SHA-1’=’cf2c54470451814eeb50106abf7706e00dee7bca’] OR [file:hashes.’MD5’=’3c44712b456b9aa865aa4b98b375430e’]
[file:hashes.’SHA-256’=’f6d959ebc1f957e5df2bad38d42595496136a2ac72b81ee7823395039cef1ecc’] OR [file:hashes.’SHA-1’=’52a66203dd10f12aac1cd6f7b59a338fdba68d02′] OR [file:hashes.’MD5’=’c522a0dbcde61110d2e2225f3af73f02′]
[url:value = ‘http://www.xn--educacinmedica-rob.com/m09t/’]
[url:value = ‘http://wysq6o3r64d46bnn.onion/tkphxmNe.js?ip=195.99.173.100’]
[url:value = ‘https://24.229.150.54:995’]
[url:value = ‘https://93.48.80.198:995’]
and from miner LOGS:
TIMESTAMP16/12/2021 11:04:57 +0100 #54548
SOURCEaggregator_eti_eset_botnet
TYPETRACE / EMIT_UPDATE
INDICATOR[url:value = ‘udp://wysq6o3r64d46bnn.onion:5588’]
VALUE
{
“stix2_created”: 1639574401000,
“_updated”: 1639649097287,
“_added”: 1639649097287,
“stix2_name”: “Command & control server”,
“sources”: [
“eti_eset_botnet”
],
“stix2_id”: “indicator–d6678b19-422d-4c40-a85e-e5862ea90551”,
“stix2_modified”: 1639574401000,
“first_seen”: 1639574401000,
“type”: “stix2-pattern”,
“stix2_labels”: [
“malicious-activity”
],
“last_seen”: 1639646029845
}
Please, could you suggest how to fix this.
I mean, your plugin expects TAXII1.1 with STIX1 (xml) format.
Thank you, for your reply.
TeeCker
LikeLike
Sorry but I’m not the mantainer of Minemeld or the plugin, can’t help on this
LikeLike